Thursday, September 29, 2011

Skinner Box

My big new project for Burning Man this year was the Skinner Box, originally brainstormed between me and my dad two years ago on the way back from the 2009 Burn. It is, simply put, a very cruel joke: an exercise bike in the middle of the desert which randomly dispenses hard alcohol. Before taking it down I made this demo video:


Not a very complicated project, but it was still a frantic couple of weeks getting it finished in time. I used a cute little 6 volt submersible food-grade pump which was being sold on Amazon for sous-vide cooking purposes. The bike was $3 from Goodwill, and I rigged up a simple tachometer using a $5 used bike computer. The non-contact magnetic sensor was just a reed switch, so it was trivial to detect it closing when hooked to an Arduino.

Photo by Jen Kale'a

It had flashing lights, a progress needle hooked to a servo, and a buzzer playing happy and sad noises to tap as many addictive gamer impulses as possible. Plus, of course, random positive feedback. The progress needle has to increment 15 times in order for a unit of alcohol to be dispensed. As long as you're pedaling, it will keep incrementing about every other second. Except that each time it does, there is a 4% chance of failure, which sends it back to the beginning. 0.9615 = 0.54, so you have slightly better than even chances of success each time you start. Each win provided about a third of a shot of the cheapest vodka I could find. Warm, cheap, slightly dusty vodka.

Photo by Jen Kale'a

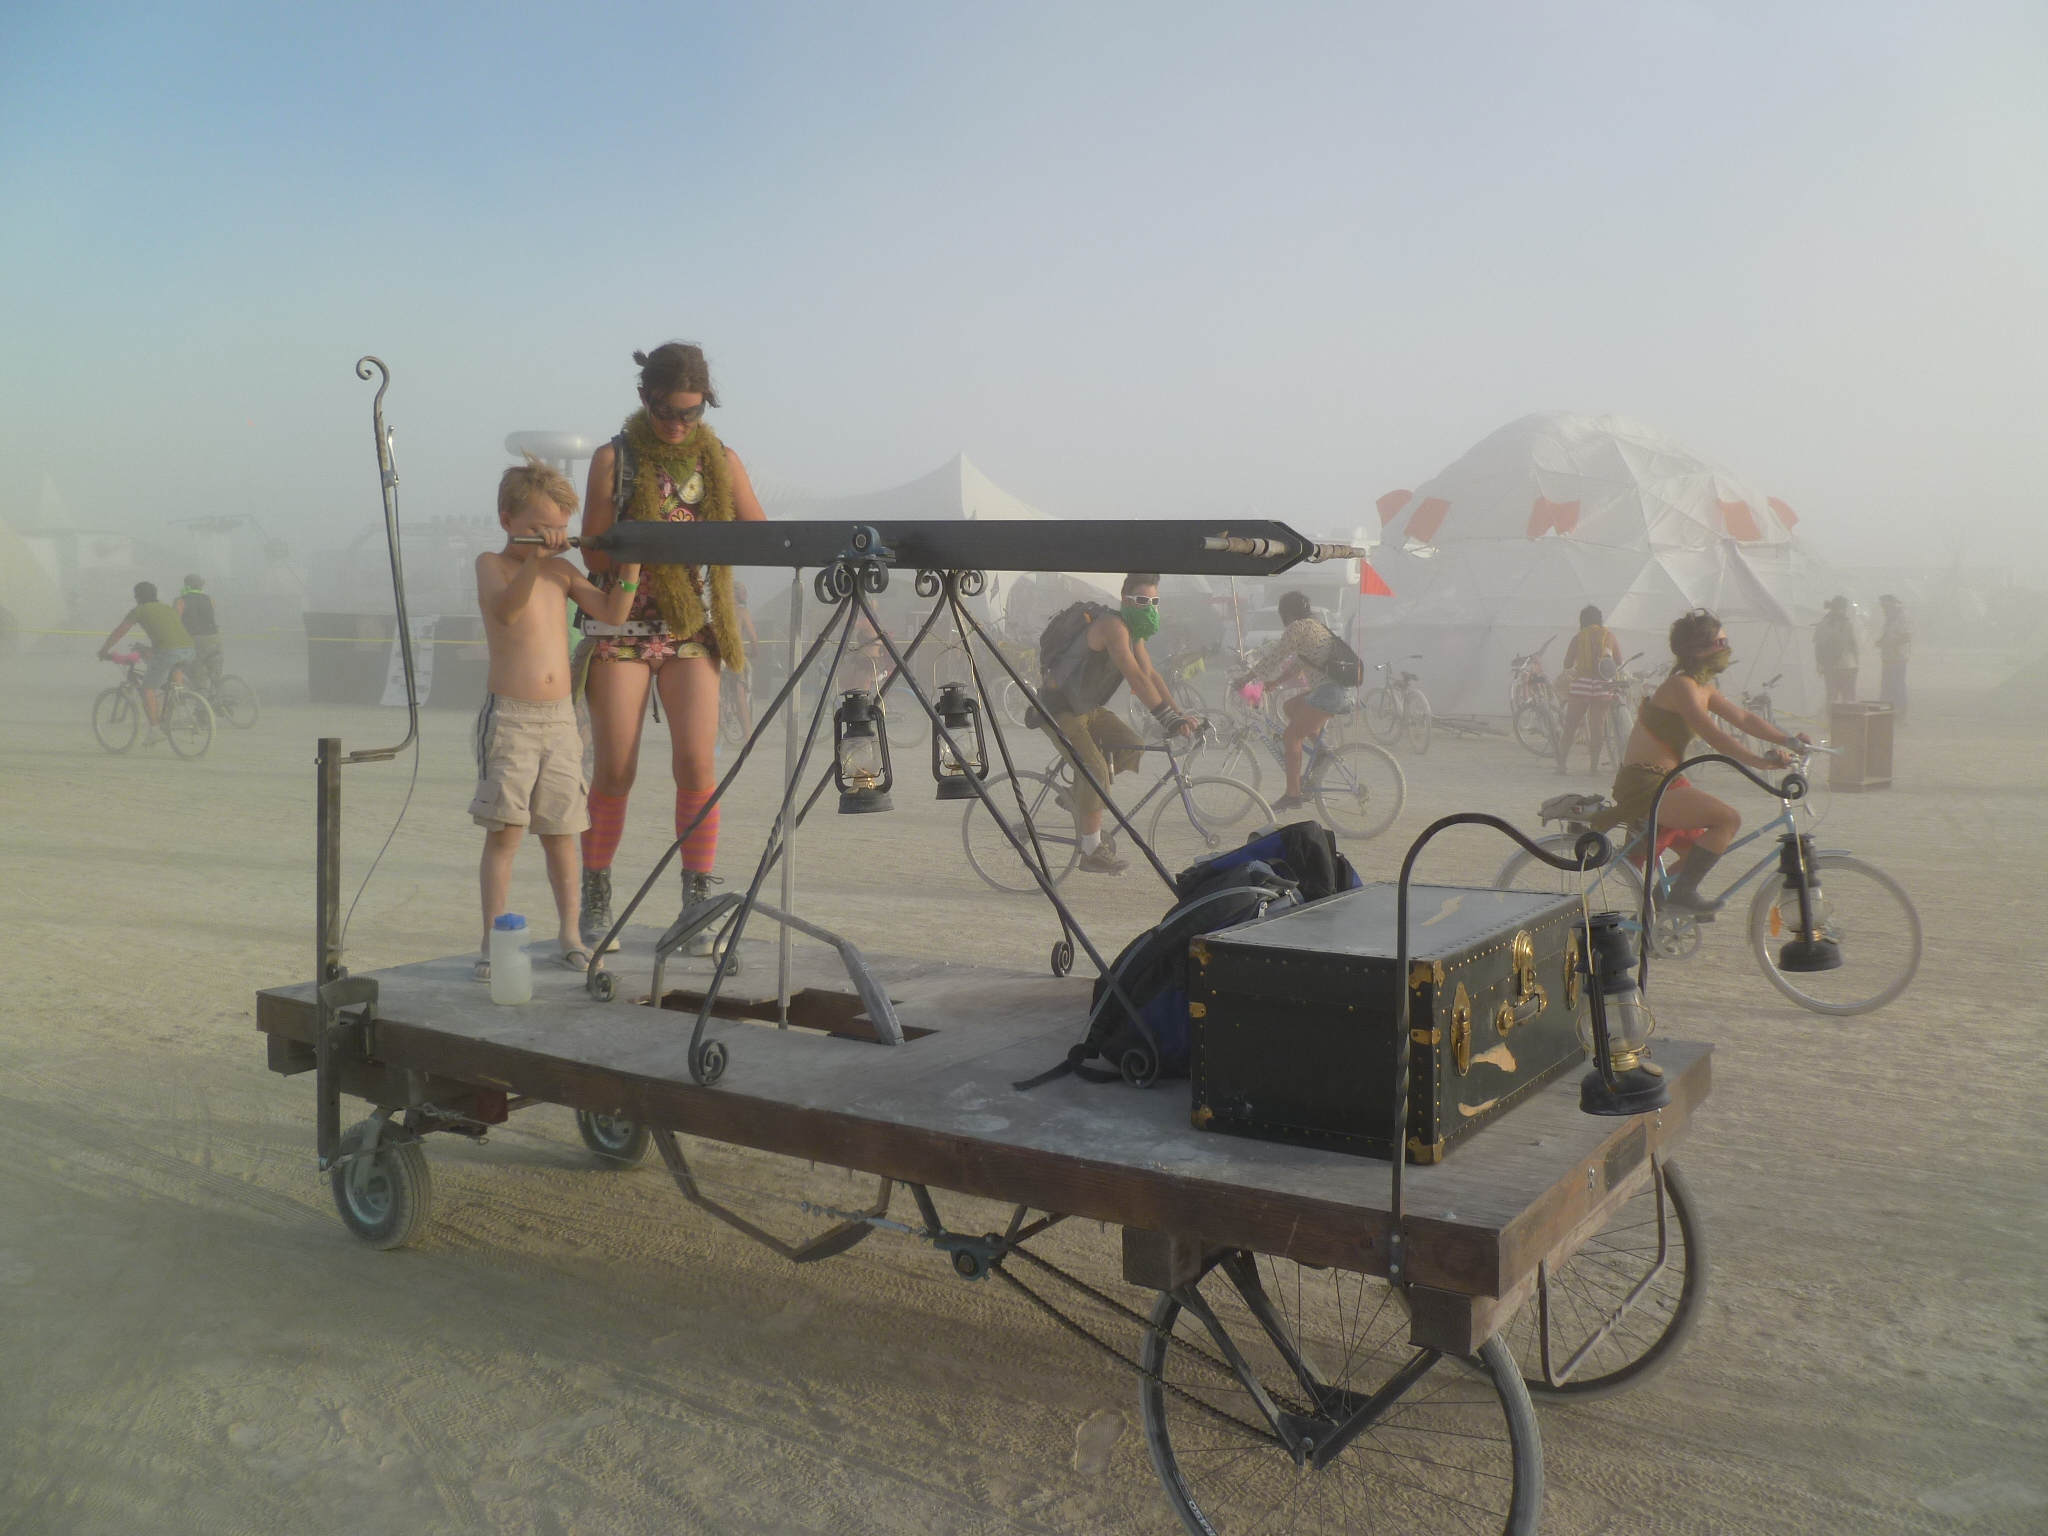
It was fairly well received on the playa. We were camped farther out on 5:00 than we'd been hoping for, though, so there wasn't a huge amount of foot traffic. It mostly just confused people, I think. Most of the people who actually used it were the ones who knew what a Skinner Box was and got the joke from that level. I did catch one or two people engaging in classical Skinner Box behavior, though, developing complex theories as to when it would and would not dispense alcohol. We didn't go through nearly as much of the cheap vodka as I had planned for, so I spent some time on Saturday going around giving the surplus out to needful bars.


The el-wire sign I made for it turned out to be the best thing about it. It was a very convenient for finding camp at night. I was very pleased with its crisp, clean lines. I probably should only have used two colors of wire, though. I was going for a classic 50s neon look and I think the color scheme just looks kind of... toothpasty. Oh well.

Photo by Jen Kale'a
 
In the end, it was a fun project, but I won't be taking it back. I don't think I like doing static installations like this in front of camp. It encouraged me to just sit there waiting for people to come by. I want to be out and about, wearing and/or riding my art. I do have some other installation ideas, but they will be 1) bigger 2) more conceptually simple and 3) on fire. As they should be.

Tuesday, September 27, 2011

Kalamazoo: Out and About

It's been a busy month or so for the Kalamazoo, which is among the reasons why I haven't made a post about any of it until now. While I hope to take it out to events in the future, the project itself is now done as far as I'm concerned. Any further improvements would require radical changes to the drive train, and that just isn't going to happen. Too many other things to work on!

Scientific Expedition and Picnic
In early August a group of friends and I dressed up in our silly steampunk best and drove the Kalamazoo down to a nearby park for a picnic. We sipped lemonade from a mismatch of thrift store tea cups, nibbled on cucumber sandwiches, and generally had a grand time.

Many pictures were taken...
Photo by Gabriel Cain


In stereo, even...
DSCF0660
Photo by Espressobuzz

And I've since taken some liberties with them:


A large amount of footage was also shot. Having recently been turned on the music of Caravan Palace, I couldn't resist making a full music video for their song Dragons. I think it nicely captures the feeling of the expedition:


ThingOut!
A week later, Ignite Seattle teamed up with Dorkbot to put together ThingOut!, a showcase of local Maker projects. We took the Kalamazoo down, which turned out to be a really good choice. It was awesome! It turns out that kids love the thing. There were 3-6 kids climbing all over it pretty much the entire time we were there. They tended to pick up the mechanical skill of driving it a lot faster than adults, too. Maybe because they don't have other driving experience to unlearn first? The whole thing left me very eager to take the device to other events, despite the logistical hassle of having to rent a trailer every time.


Burning Man 2011
And a week after that I left for the playa, taking the Kalamazoo down for the second time. This made me a bit nervous, if only because last year had been such a big failure. But despite it still be very, very slow, it worked much better this year. Hooray!


On Wednesday night I took it all the around Esplanade. That was about 3.6 miles and it took over 7 hours (with many rest breaks, but still). My arms nearly fell off! But I did it. The Kalamazoo finally proved itself under full playa conditions. The addition of the trunk made an expedition of this length quite easy to pack for. We had 2 gallons of water, food, tools and bike pump for an emergency, and spare lamp oil for the lanterns. Very civilized
Photo by Jen Kale'a

People would occasionally jump on for a ride or to help pump, but we were going so slowly that was fairly rare. Got a lot of good comments, and some annoying/stupid ones. But the people who liked it really liked it. One person, upon finding us slowly creaking along out by the Temple, said we had made his Burn. Which, in turn, totally made mine.
Photo by Jen Kale'a

Sunday, July 17, 2011

Flywheel weight casting

After finishing the new flywheel, I couldn't leave the lead weights so clunky and ungainly. So I set about casting them with nice conformal curves to match the circle of the octagonal flywheel.


I needed a shape to make the mold around, so I took a block of beeswax I had laying around and started working it into shape. First I roughly shaped it on the flywheel itself, to get the size right. The curve was compared against a paper template I made up using a yardstick compass.


Then I heated up a spare section of angle iron with my blow torch, and used that to smooth down the sides. With the blank ready, I printed out an "ATTOPARSEC" label and transferred it across, carving the letters into the wax. Might as well keep up my branding, right?


This was affixed (using a bit of melted wax) to the bottom of a small cardboard box I made, and RTV silicone was poured over it. Silicone can take the heat of lead casting fairly well, but it isn't cheap. If I did this again, I'd probably play with sand casting first.


With the positive removed, the silicone mold shows how well it picked up all the details.


While fairly low temperature, lead casting should be approached with caution. Like all metal casting, it shouldn't be done over concrete. Because lead is, of course, toxic, only do it outside in a well ventilated space. Don't breath the fumes if you can help it! Wash all your clothes and your self immediately after finishing. But other than those worries, it's a pretty easy process. A little propane burner is more than enough to melt lead, and any steel can with fairly thick wall can be used as a pot. I drilled a #19 (0.166") hole for a pouring spout, which also helps strain out the dross. Later I drilled it out to an H (0.266") to get it to flow better.


Wearing full safety gear (all natural fibers, long pants and thick coat, leather boots, safety glasses and full face shield, filter mask, casting gloves, hair tucked away) I grabbed the pot using a pair of blacksmithing tongs and poured in the molten lead.


It came out a bit chunky, and not very fast. It was a bit too cool and the hole wasn't big enough, but the result wasn't too bad.


The mold suffered a bit of degradation, but that was worst on the first cast. I used it a total of 6 times, and it could certainly handle a couple dozen more still.


The end result is pretty good, I think. I'm not entirely sure why the first one was such a different color. It was poured at a lower temperature, I think. The exact alloy would have been a bit different, as the later ones had some lead from a scuba diving weight mixed in.

I've only attached 4 of the weights so far, giving the flywheel roughly the same mass as before, though they're slightly more optimally placed. It works quite well and looks very slick. It's a real flywheel finally, not some weird kludge.


This is probably the last major change to the Kalamazoo. It's been fun, but it has already gone on a year longer than I originally planned. There are too many other crazy things waiting to be built!

Monday, July 11, 2011

Flywheel mania

The most persistent problem with the Kalamazoo has been the temperamental drive. Every stroke of the pump lever would result in a terrible clank, and it was very hard to keep the thing moving. You had to time your pumps exactly right, while not applying any force at the top and bottom of the stroke. That is why one of the first things I did this year was cut the decking to allow for much longer arms on the simple flywheel hack. That helped, but a greater flywheel effects was needed.


This is what I came up with, a welded hexagonal ring. It's made out of two sections which bolt together, which allows it to be mounted without having to remove the crankshaft. Lead weights are then bolted to the ring to increase its rotational inertia.


About a week after finishing it, we finally got around to running a full roadtest using it, with very positive results.


The Kalamazoo is finally handling as I had always imagined, though it's still very slow. Carrying passengers worked well and made the motion even nicer. We've found that having a secondary driver in the forward position doesn't help very much. Synchronizing pumping between people turns out to be a difficult thing. I'm thinking of adding an unpowered dummy in the front position, but I probably won't get to that.

I'm now working on casting the lead weights into a more conformal shape which will allow them to be mounted on the outside of the wheel. This should be both more efficient and more aesthetically pleasing.

Friday, June 17, 2011

Kalamazoo: Flywheel and steering

First Kalamazoo update of 2011! This covers the recent upgrades to the flywheel and steering mechanism.


Also, after some last minute failures, the Kalamazoo will not be appearing in the Fremont Solstice Parade, which is disappointing. But a lot of good progress has been made, so I'm confident I'll have it working properly in time for Burning Man this year.

Wednesday, June 8, 2011

EL Wire Interface Kit

As I've vaguely mentioned in a couple of posts, I've been working on productizing the the EL wire interface cards I used in the Lightsuit. This involved getting a custom circuit board printed, which was a first for me. Designing some simple packaging and documentation was also fun. It isn't anything fancy, but it is entirely functional.

The kit was finished just in time for the Kitsap Mini Maker Faire last week. That makes it's past time to make the official announcement online: the Attoparsec Eight Channel EL Wire Interface Kit is now available!

What can this kit do for you? Control up to 8 strands of EL wire from a microcontroller. Why would you want to do that? Because it's awesome -- and can be lot more interesting than just having it blink.


Setting up that little demo took a couple of hours. For an example of what can be done with a little bit more effort...


The kit is selling for $20 in person, $22.50 online with shipping included. Plenty of time left before That Event In The Desert to do something really cool. Just saying.

Monday, June 6, 2011

Kitsap Mini Maker Faire -- The Day After

I spent yesterday at the Kitsap Mini Maker Faire showing off Attoparsec projects and generally having a delightful time. It was small -- but very well attended. We took the Lightsuit, the new EL wire interface kits, the etched brass fan, the Fireprop, and the full-scale hip joint from the hexapod project. I also took the RC hexapod model, thinking it would be a hit with kids. I was very, very right! I felt bad showing off something I just made from a kit, but my excuse was that it made a nice explanation for the large hip joint prototype.

I was talking pretty much the entire 6 hours of the Faire. It was exhausting, but also a lot of fun. We also sold 3 kits! (Which I still haven't posted about properly, I know.) Our display was pretty random, so I'm glad people seemed to really get into it all the same. I think I have a better idea what makes a good booth presentation now, which will be useful when we go down to the big SF Maker Faire in force next year. But if there is a second year for the Kitsap Mini Maker Faire, I'll definitely go again.